The cheapest way to harvest rainwater
Previous
Next
Up
Home
30/12/18
If you live in an elevated house, there are simple ways to harvest greywater for your garden (see here for details). Having a regular, controlled supply of water makes this a good option. Most newer homes however are on a slab. While this is great for thermal comfort and maintenance, your greywater pipes are not accessible. The next best option for this situation is to harvest rainwater. You might immediately think of rainwater tanks, however if you consider all the costs and inconvenience involved, and how cheap mains water is, tanks are not such a great deal after all. Plus, the environmental impact of all of that plastic is not insignificant. Fortunately, there is a far simpler and cheaper option: storing water in the ground. By this I mean simply diverting water from your downpipes onto the ground.
Disclaimer: there are a lot of rules and standards covering the design and installation of gutters and stormwater systems. Depending on where you live, the suggestions here may not comply. Proceed at your own risk.
Using rainwater this way involves some risks. In considering your options, keep the following in mind:
-
Do not divert a lot of water to the uphill side of your house or your neighbour’s house. You may be liable for any water damage caused.
-
Do not divert a lot of water onto a steep slope or onto poor soil that is prone to erosion.
-
Clay can expand when wet. Uneven expansion could cause a concrete slab to crack.
-
Tree roots will follow water and can cause problems with building foundations.
-
Excess moisture causes timber rot and encourages pests such as termites.
-
The ideal conditions for this option are a gentle slope away from your house with a deep layer of porous topsoil, with water-hungry plants. A deep sublayer of clay or a thick layer of mulch may also improve the ability of the soil to store water. Also, there should be a good drainage system further downstream.
There are a lot of options for harvesting rainwater this way. The two primary decisions you need to make are whether to allow the water to free-fall to ground or divert it through a piping system, and what diameter pipe to use. Smaller diameter pipe will passively control flow, so that in light rain most of the water can be captured, whereas in heavy rain most of the water goes down the stormwater piping. Note that as your system will be gravity-fed, narrow pipe or long pipework will significantly reduce flow rates. Your options include:
-
Half inch (12 mm) low density poly pipe. This is the same diameter as conventional garden hose. This is probably too small, but may be suitable where you only want to divert a small amount of water.
-
Three quarter inch (19/20 mm) low density poly pipe. This is a good option for limiting flow rates. I use this option most often.
-
One inch (25 mm) low density poly pipe. This would drain all of the water except in heavy downpours. I have never used this option.
-
Standard PVC downpipe (90 mm). This will allow you divert all of the water, but you will need to be able to switch it off.
Taps are recommended for all options to turn the system off and divert water into the stormwater system in particularly heavy or prolonged rain. Do this when your soil becomes waterlogged and there is surface water running off.
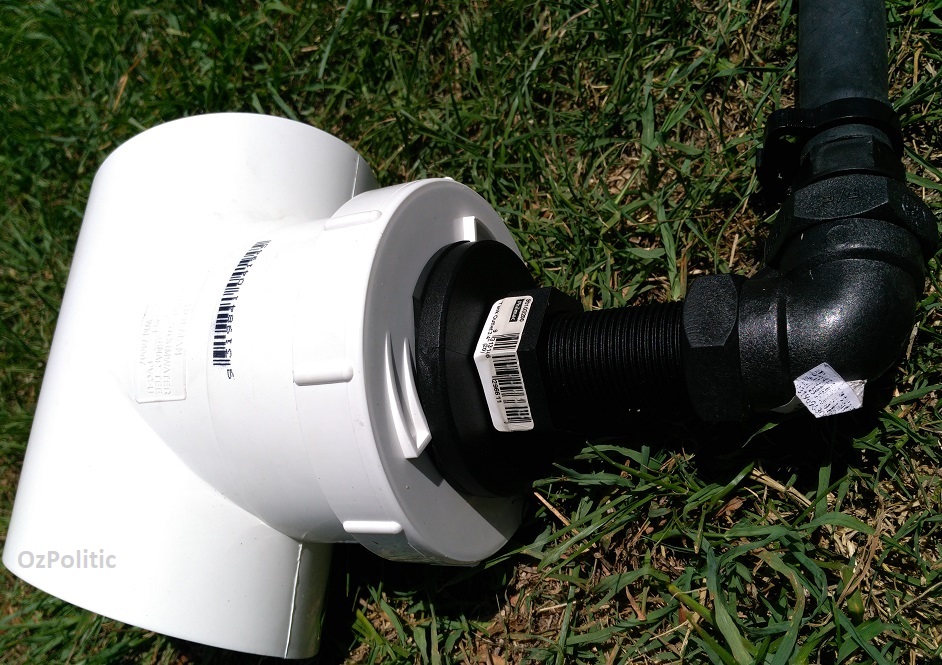
The low density poly pipe options all passively limit the flow rate. That is, no intervention is required in heavy rain, as most of the water will bypass the system (though a cut-off tap is still recommended). The water is gravity-drained from the existing downpipe without blocking it. Below is an example using 19 mm low density poly pipe.

Some things to note:
-
This is a “snap-on” system and can be removed easily, though some repairs to the downpipe would be necessary.
-
The system is gravity fed.
-
The attachment point is on the horizontal section of downpipe, as close to the gutter as possible. There are two reasons for this. One is that you will be diverting the water away from your house, so this minimises pipe length. Two, the ‘horizontal’ pipe is actually on a gentle incline, and the water picks up speed as it travels along the pipe and may simply flow over the drainage hole.
-
No blockage is introduced to the existing pipework. You need to drill holes in the existing pipework after attaching the fitting.
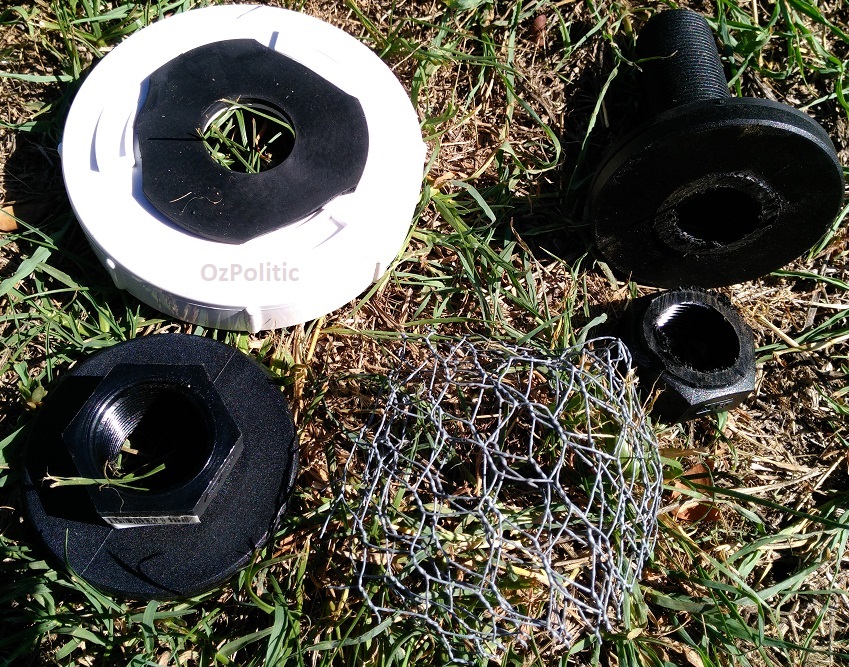
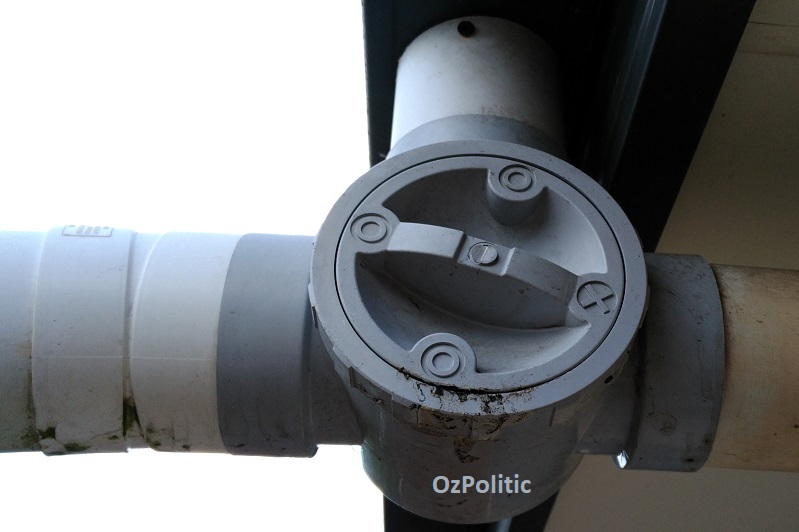
Below are some photos of parts and the assembly procedure:

The parts are listed below. Note that 19 mm and 20 mm threaded fittings may be interchangeable, but check first.
-
90 mm stormwater snap tee, including male threaded adaptor (assuming you have 90 mm round downpipe)
-
90 mm threaded end cap
-
Chicken mesh
-
19 mm tank adaptor
-
19 mm female-female threaded elbow
-
19 mm barbed adaptor
-
Also needed, but not shown:
-
19 mm low density poly pipe
-
19 mm barbed elbows
-
19 mm in-line valve (tap) with barbed fittings
-
19 mm ratchet clips
-
Some way to secure the pipe. Zip ties are convenient, but only last a few years in the sun.
Two modifications to the parts are shown below. The rubber seal on the tank adaptor was cut to fit inside the raised bits on the 90 mm end cap. Note that I avoided cutting the raise circular ridges on the rubber seal. I also cut off the top nut on the tank adaptor, as I think this improves water flow by creating a deeper pool of water inside the snap tee for the pipe to drain from. This does make assembly slightly more difficult.
It is difficult to get everything to seal tightly, however as this is a low pressure system a good seal is not necessary. Plumbers glue is optional, and I would advise against it, as you may want to disassemble for maintenance or modifications. The male adaptor can be secured to the snap tee with a single screw, but this is typically not necessary.
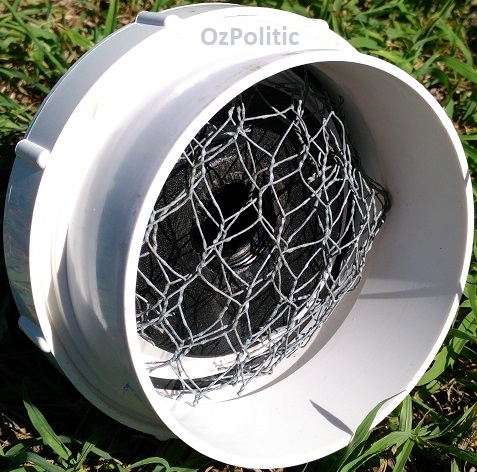
The dome of chicken mesh is to stop large objects from blocking the pipe. Use this if you put large holes in the existing downpipe (you would need a hole saw for this). Alternatively, drill a series of 10 mm holes. Large objects will pass over them and get flushed down into the stormwater system. This will also limit flow rate.
To divert all water, use 90 mm downpipe, as shown below.
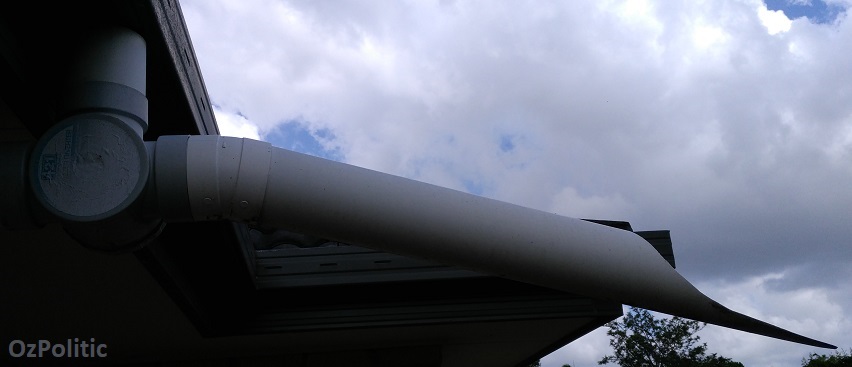
I only use this is one location, due to the amount of water that comes down in heavy rain. It is a free-fall system.
Start with a 90 mm tee with an in-built tap. This will allow you to divert the water into the existing downpipe or the diverter as needed. Replace the first elbow in your downpipe with the tee. This is easy to do, but get advice if you have not done it before. Use plumbers glue to secure.
Next, attach a 15 or 22 degree bend piece or similar. Do not use plumbers glue on this piece, as you will need to do some experimenting to get the incline right by rotating the bend piece. This also allows you to direct the flow somewhat sideways. Finally, attach a length of 90 mm pipe to get the water as far from the house as possible. The option shown allows the water to free-fall to ground. This will dig a small hole. Coarse gravel will help reduce erosion. Pavers would also work. This last section of pipe should be as long as possible, but is limited by the weight of the water inside. I tapered the end to reduce the weight. In heavy rain, this has the added benefit of breaking up the water stream somewhat, as a lot of the water falls off the side of the narrow tapered section.
Finally, consider whether you want the water to free-fall to the ground, or divert it into pipes to take it further away (or both). I have one system where 3 downpipes are diverted into the same 19 mm pipe network. Two of these three also have free-fall diverters (see below for an example). In light rain, the water from all three downpipes goes straight down into the pipe network, to which I have attached some three quarter inch garden hose that I can move around the yard. In heavier rain (it does not have to be very heavy), the water backs up the system and some goes out sideways though a tee piece to two free-fall diverters. The extra pipework for this is all low density poly, as the fittings are fairly cheap. The combined free-fall and pipework option requires additional vertical pipe below the 90 mm snap-on tee. You might want to consider head-room for this option, as tall people will hit their head on it if there is not enough. Both of the free-fall diverters and the garden hose outlet all have inline valves so they can be turned off individually.
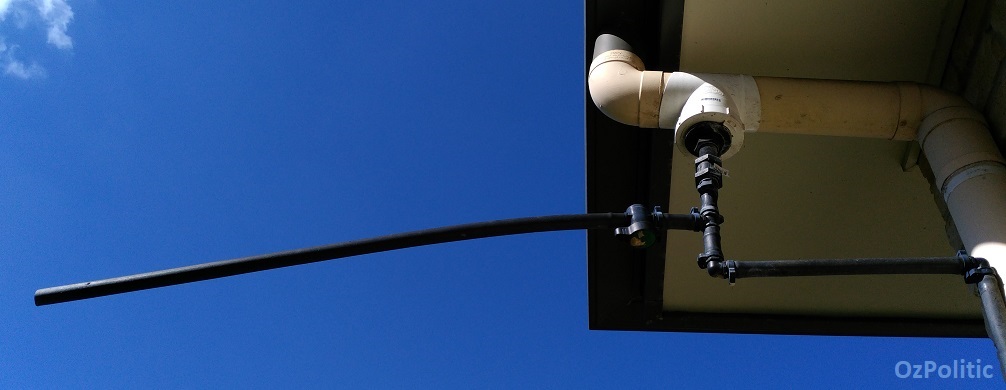
Note that 19 mm low density poly pipe will flex significantly under the weight of the water, which actually helps with drainage, but limits pipe length for the free-fall option. You can add additional support by tying it to the gutter.

|